


Kate Stafford was particularly annoyed at the idea that she'd have to spend hundreds of dollars on Adobe Illustrator, just to carry out the required format conversion.

Then I remembered that my excellent postdoc has figured out how to do this using only free software. Here's his method:
WHAT PLOS RECOMMENDS:
Here (slightly edited for clarity) are the PLoS guidelines for converting PNG-format files to TIFFs using GIMP, an open-source version of Photoshop (similar instructions are provided for PDFs and some other file types.):
In GIMP:
1. Open the PNG from the File menu. You will need to do this one page at a time.
2. Crop the image: Use the Crop Tool (third row, second from the right, looks like a knife blade) to select an area close to the borders of your image. Hit Enter to apply the crop.
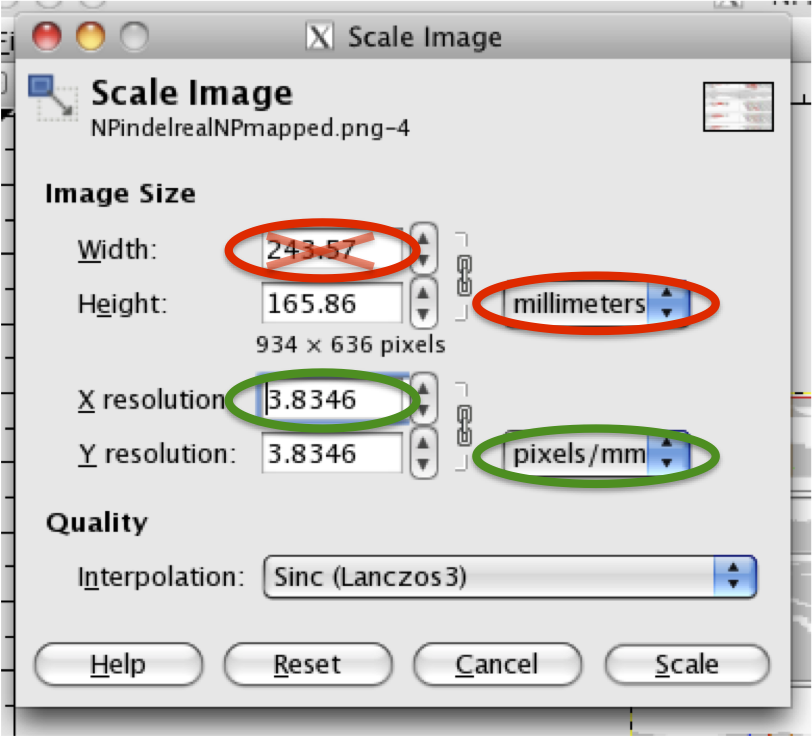
3.Resize the image: Under the Image menu choose Scale Image (see screenshot below). In the pull down menu next to Height (RR: red oval on right), set the units of measurement,to millimeters. If the Width is over 173.5mm, type 173.5 in the Width box (RR: red oval with an X in it) (17.35cm is our maximum allowable width for figures) and hit Tab. The new Height of the figure will appear, scaled proportionately to the change in Width. The Width cannot be below 83.0mm, and the height cannot be more than 233.5mm. If the Height and Width are within these prescribed limits, no adjustment to your figure size needs to be made.
4. From the File menu: choose Save As. Click the + sign next to "Select File Type (By Extension)". From the menu that appears, select TIFF. Click Save. Set Compression set to LZW. If you're prompted about layers in the file, select Flatten Image.
But it doesn't work!
THE PROBLEM:
Step 3 of the recommended process above tries to shrink the image by adjusting its size in mm to below 173.5. Resizing this way massively downgrades image quality.
THE IMMEDIATE SOLUTION:
The work-around is to use the lower set of controls to increase pixels/mm instead of decreasing mm. This causes a correlated change in the size of the images, so doesn't degrade image quality.
First do use the upper drop-down menu to set the image size units to millimeters as instructed above (red oval on right). Don't change the numbers in the box in the other red oval.
Instead use the lower drop-down menu to change the resolution units to pixels/mm (green oval on the right), and use the box beside it (other green oval) to increase pixels/mm until the image size (in the other red oval) falls to ≤173.5 mm.
A DESIRABLE LONG-TERM SOLUTION:
This ought to be fixed in PLoS's instructions to authors, so that people can use open-source software to get their images to PLoS's specifications.
GIMP is actually comparable to Photoshop. Perhaps Inkscape might be helpful, being similar to Illustrator?
ReplyDeleteJosh Neufeld
Corrected, thanks!
DeleteGreat tip! I posted a similar working protocol for making PLOS figures using Illustrator last year: http://bergmanlab.smith.man.ac.uk/?p=1788
ReplyDeleteIf you use ImageMagick's "convert" you can do this on the command line:
ReplyDeleteconvert -density 300 figure.pdf -alpha off -trim -mattecolor white -frame 2x2 temp.tiff
The density option is useful for converting a pdf into a pixel-based format at 300 PPI. In some places I convert to 600 PPI and then scale the image by 50% to clean up fonts.
If you are converting a PNG then you might may need to scale the image if it is not already in 300 PPI.
They changed/renamed the "Save as" functionality to "Export" in the recent version of GIMP; "Save as" is used now for saving into the GIMP's native file format.
ReplyDelete